
The Ultimate Guide to Rattan Weaving: Patterns, Uses, and Options
Rattan weaving is popular again in home decor. This guide covers cane webbing and rattan webbing fully. You will learn the main types of cane webbing. We will also show you clear project steps. Let’s start with the basics.
What is cane webbing?
Cane webbing and rattan webbing are the same material. It comes from the rattan palm. The plant’s outer skin is peeled and woven. This creates strong, flexible sheets. People use these sheets for furniture. You see them on chair seats and cabinet doors. What is cane webbing used for? It is for both repair and new builds.
Why choose rattan webbing?
Rattan webbing adds natural warmth. It fits many decor styles from modern to coastal. The weave allows good air flow. This material is also very durable. It is a renewable, eco-friendly choice. With simple care, cane webbing lasts for many years.
Two Main Types of Cane Webbing
You must pick the right type. Your choice affects the project’s life. Learn the main types of cane webbing below.
Natural cane webbing comes directly from the plant. It has a warm, golden color. Each sheet has unique marks. You must soak it before use. This softens the fibers. It is only for indoor furniture. Sun and rain will damage it.
Synthetic rattan webbing is man-made. It uses strong plastic fibers. It looks very close to natural cane webbing. The big benefit is weather resistance. Use it on patios or porches. It will not fade or crack. No soaking is needed. This makes it easier for beginners.
Understanding Weaving Patterns
The pattern changes the style. Pick one that fits your furniture’s look.
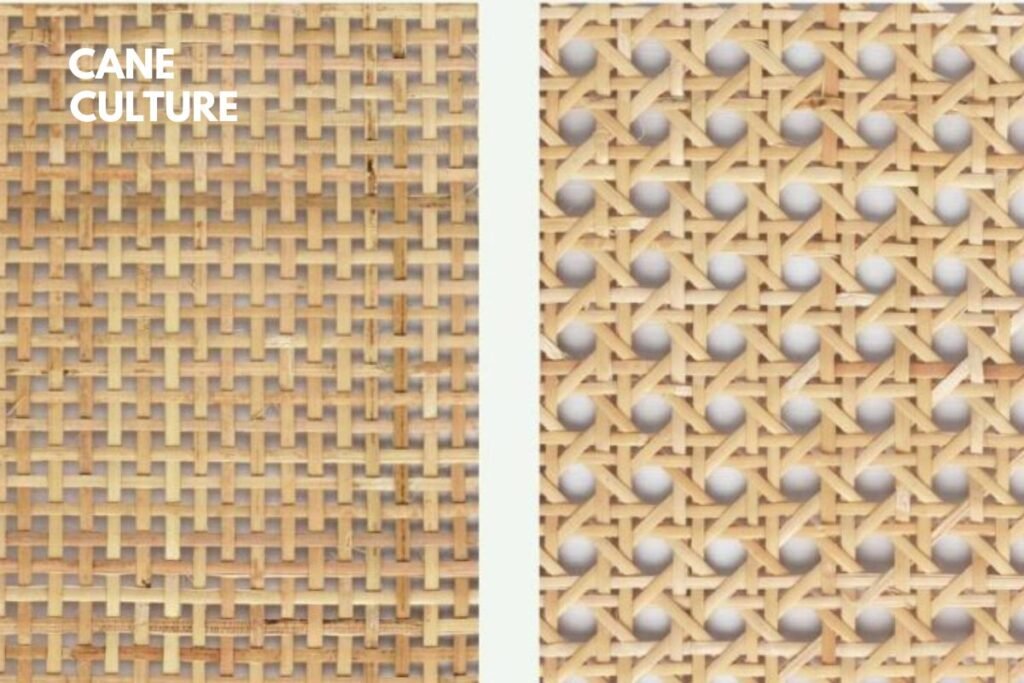
Standard Weave is the most common cane webbing pattern. It has small, tight hexagons. This is the classic look for chair seats.
French Weave has larger, open hexagons. This rattan webbing pattern feels light and airy. It is good for lamp shades. Many decorative Cane Light Designs use open weaves like French patterns to create soft, airy lighting effects.
Herringbone Weave creates a diagonal zigzag. This is a modern cane webbing choice. It adds strong visual texture.
There are other patterns too. You can find diamond weaves or tight checkerboards. These are less common but very beautiful.
How to Pick the Right Rattan Webbing
Ask yourself three questions. Where will it go? What is your skill level? What style do you want?
First, decide the location. Is it for inside or outside? Always use synthetic rattan webbing outdoors. Use natural cane webbing for indoor pieces.
Next, think about your experience. New crafters should start with synthetic. It is easier to handle. You can move to natural cane webbing later.
Finally, choose a pattern. Look at your furniture. A traditional chair needs a Standard Weave. A modern headboard might use Herringbone. The pattern should match the item’s style.
Tools You Will Need
Gather your tools before you start. You will need sharp scissors. A staple gun is essential for installing cane webbing. Use 1/4-inch staples. Have a tape measure and pencil. You need a spray bottle with water. A flat tool helps tuck edges. For natural rattan webbing, you need a tub for soaking.
Step-by-Step Installation for Cane Webbing
Follow these steps for a tight, professional finish.
Remove old material from your frame. Clean the frame well.
Measure the opening. Add four inches to the width and length. This is your cut size for the cane webbing.
Cut your rattan webbing to this size. Use sharp scissors.
If using natural cane webbing, soak it. Submerge it in water for 15-20 minutes. Synthetic does not need this.
Place the damp webbing over the frame. Make sure it is centered.
Start with the longest side. Find the center point. Pull the webbing snug and staple it.
Go to the opposite side. Pull tight and staple the center.
Now do the two shorter sides. Always work from the center outward.
Keep stapling, moving out from each center. Alternate sides as you go. Pull firmly for a tight finish.
Handle the corners last. Fold the extra material neatly. Staple it down.
Trim any loose strands.
Let the piece dry fully. Natural cane webbing will shrink and become tighter.
Cleaning and Care
Proper care makes rattan webbing last. Dust it weekly with a soft brush. For marks, use a slightly damp cloth. Dry it immediately. Never use strong cleaners.
Keep natural cane webbing away from direct sun. This prevents drying. In dry climates, lightly mist it once a year.
Synthetic rattan webbing is easier. Just wash it with soap and water. It can handle all weather.
Fixing Common Issues
Cane webbing can sag over many years. Fixing it is often easy. Lightly dampen the back of the weave. Let it dry naturally. The fibers may shrink and tighten.
For a broken strand, use clear-drying wood glue. Apply a tiny drop. Press the strand back into place.
Simple First Projects
Start with something small. Re-cover a simple stool seat with cane webbing. Make a small trivet. Create a picture frame accent.
Then try bigger items. A dining chair seat is a great project. A cabinet door insert changes a whole piece.
Finding Good Materials
Buy from a trusted seller. You can find a wide range of Cane Webbing and Rattan Supplies by browsing a complete shop that focuses on weaving materials. Look for clear photos of the types of cane webbing. Read customer reviews. Good rattan webbing has a consistent weave. The strands should be even.
Ask about the source. Sustainably harvested cane webbing is best.
Conclusion
Cane webbing is a useful skill for any crafter. It lets you restore furniture beautifully. Start by choosing your material. Use synthetic rattan webbing outdoors. Use natural cane webbing for indoor projects.
Pick a pattern that fits your style from the main types of cane webbing. Follow the installation steps closely. Keep your tension even for the best result.
Care for your rattan webbing properly. Dust it often and keep it dry. This will make your work last longer.
This craft is not hard to learn. Your first project teaches you a lot. You will improve with practice. The goal is to create something you love.
Find good cane webbing from a trusted seller. Choosing a trusted cane and rattan source helps ensure consistent quality and properly woven materials for long-lasting results. Then start with a simple stool. Enjoy working with your hands. You will bring beautiful, natural texture into your home with rattan webbing.
Frequently Asked Questions
What tools do I need for cane webbing?
You need a staple gun and sharp scissors. A tape measure and spray bottle are also key. These tools help install rattan webbing properly.
How long does natural cane webbing last?
Natural cane webbing lasts for decades indoors. Keep it out of sun and damp areas. This prevents drying and mold.
Can I paint cane webbing?
Yes, you can paint or stain rattan webbing. Use a brush for thin coats. Water-based paints work well. Test color on a scrap first.
Why does my new cane webbing feel rough?
This is normal for new material. It will soften with use. You can lightly sand it with fine paper.
Can I use cane webbing for a table top?
It is not good for a full table top. Use cane webbing as a decorative insert. Place glass over it for protection.
What is the best way to store extra webbing?
Roll rattan webbing loosely. Do not fold it. Store it in a dry, flat place away from sun.
Is rattan webbing safe for pet furniture?
Yes, it is generally safe. Pets may scratch it. Synthetic cane webbing resists claws better.
How tight should I pull the webbing during installation?
Pull it until it feels like a drum skin. It should sound a little when tapped. It will tighten more as it dries.
Can I use cane webbing on a curved back chair?
Yes, you can. Use natural cane webbing for curves. Soak it well to make it very flexible. Work slowly and use more staples.
What’s the difference between cane, rattan, and wicker?
Cane and rattan refer to the material. Wicker is the weaving technique. Cane webbing is the pre-woven sheet you buy.


4 comments
Pingback:
Diy Cane Webbing Installation: Step-By-Step Diy Guide!!Pingback:
Natural vs Artificial Cane Webbing: Which One to ChoosePingback:
Cane Webbing DIY Projects: Easy Cane Decor Ideas GuidesPingback:
How to Style Bamboo Lampshades in Your Home Decor Ideas